Showing posts with label kids. Show all posts

Sunday, January 15, 2012

Beauty and the Beast Breakfast

By far my favorite Disney princess has always been Belle. With "her nose stuck in a book" and her ability to see true beauty within, what's not to love? So when I first saw they were rereleasing the movie in 3D, I knew taking the girls was a must. With Chirstmas over and our elf-on-the-shelf back in the North Pole, I was missing some of that morning magic so I decided to suprise the girls with a special breakfast to announce our movie trip. You should have seen the looks of pure astonishment and giddiness when they came downstairs on an ordinary Friday morning to see the dining room table all adorned for a special breakfast.


Our Lumiere-esque sign read, "It is with deepest pride and greatest pleasure that we welcome you this morning as your Mommy proudly presents your Breakfast."


For breakfast, the girls dined on vanilla yogurt with strawberries cut in the shape of enchanted roses...


...and cranberry-orange mini-muffins in rose paper cups.


I decorated the table with an enchanted rose and mirror and piles of vintage books.


Mrs. Potts, Chip and Lumiere also joined the festivities.

The girls also recieved new Belle t-shirts to wear to the movies and a little goodie box with a Belle pez dispenser and candy inside.


The buffet was set up for our after-movie treat: a new Belle nightgown for each girl and special snack, a Beauty and the Beast cake.


Each girl had her own Belle on the cake (when you're a twin- it's all about the fairness.)


The movie itself was as magical as I had remembered it. The 3D effects were stunning and the girls were mesmerized the entire time. My favorite part of the day however, was as when we were tucking them in and I heard, "Mommy, this was the best day ever!" 


Catch me partying here  !

Monday, July 26, 2010

Play Space

In the midst of changing the girls' nursery into a "big girl" room, I was also able to tackle organizing the play/ toy storage space. Really I had no choice- the rocking chair and a bookshelf that was in their room just didn't fit with the two twin beds but I love the way this space came out too. It also has really slanted ceilings but I think it works great here for a little people play space.

I painted the small canvases behind the rocking chair to match the rug. The one great thing about slanted ceilings is you don't have to worry about a lot of art work.


These little hanging boxes work great to hold collectibles that I don't want little hands to accidentally break.
Notice three lamps- that is because there are no windows; technically, this space is only a hallway between their room and ours.


One of my favorite twin signs.


Now if only it would always stay this neat and organized...
If you haven't entered for a chance to win a $40 CSN gift card, leave a comment here.


Link Parties...

Sunday, July 25, 2010

Big Girl Bedroom & GIVEAWAY!

Even though I still slightly melancholy about turning the girls' nursery into a "big girl" room, I am pleased with the way it turned out. Also I am a little suprised too.  That is because of the amount of space we now have with putting bigger beds in. Our house is a very tiny cape cod and on the entire second floor the ceilings are slanted. Less head room makes the small square footage seem even smaller so I wasn't even sure two twin beds would fit but Mr. Cabin measured and assured me we could make it work.


With the second bed, you can really see how low the ceilings slant. (Although it is kind of cozy.)


Mr. Cabin and I made the headboards ourselves.


My favorite part of the room is the furniture. I was lucky enough to grab it from my mother-in-law. This dresser used to be up against the pink wall under the window. I had to fight the urge to bust out my paintbrush and paint the pink walls green and the green walls pink so the furniture would stand out more.
Mr. Cabin said I was nuts and I quickly got over it.


I love the old hardware on these pieces and the worn distressed paint.


A few details...


This mirror was the girls' favorite part- there was no mirror in their nursery so they just thought this was soooo cool. They had to run and get their pretend lipstick to put on.

If we had more space, I would love to get them a little vanity which brings me to my giveaway. Jessica from CSN contacted me and asked if I would be interested in giving a gift certificate away to one of my readers and I said sure, why not!

I know these CSN gift certificates have been all over blogland but you can use the $40 to purchase some great things. I would put it toward one of these bedroom vanity . (The girls would go nuts!) But you could put this one-time use gift card toward any of the thousands of items at CSN.  There may be shipping charges or international fees if you live in Candaa. 

For a chance to win,  just leave me a comment.
For a second chance let me know if you are a follower, if not you can join with the google friend connect in my sidebar, and come back and tell me in a seperate comment.

And for a third chance, post about this giveaway on your sidebar or blog about it and tell me in another comment.

We will pick the lucky winner on August 3rd!

Good Luck!


Tuesday, June 8, 2010

Playset Re-do Preview

Last year, we made the difficult decision to have a gigantic, noble oak tree cut down in our backyard. Feel free to read all about the saga.  It was heartbreaking.


Searching for the silver lining in the cloud, we thought about how we could use the space. We had already planted new trees in different parts of the garden so this space was free. It was enough area for the playset we thought we would never be able to fit in our yard. So this spring, a year after the tree was cut down, we were ready to build one,  only to discover we still had roots. Lots and lots of roots. Massive roots that we were chipping away at for weeks- I kid you not.


Finally we needed to bring in one of these guys again...

..my poor pavers.
But at long last, most of the roots were gone and we could begin building the playset.
 Luckily our neighbors were getting rid of the playset their grandchildren had outgrown.
"Of course we'll take it!"

However, Mr. Cabin could not leave good enough alone.
Oh no- not when you can re-hab, re-furbish and build it bigger and better!

Mr. Cabin: The canvas roof is ripped and torn maybe instead of replacing it with new canvas I can build a solid roof instead. What do you think? 
Me: That's a great idea, but can we build something that has a little character. Maybe a little cupola on top or something?
Mr. Cabin: Character? For a playset? Are you serious?
Me: Well why not?

And so with that Mr. Cabin began his super-secret building plot.

For an entire day, I was convinced he was building me a planter box.
On the ground this box he was building looked exactly like a planter box!

What it was....was a whole new level- a ladder to a lookout tower. 
A little more than what I expected when I asked him to add a little character!
No problem re-enacting Rapunzel at our house now.


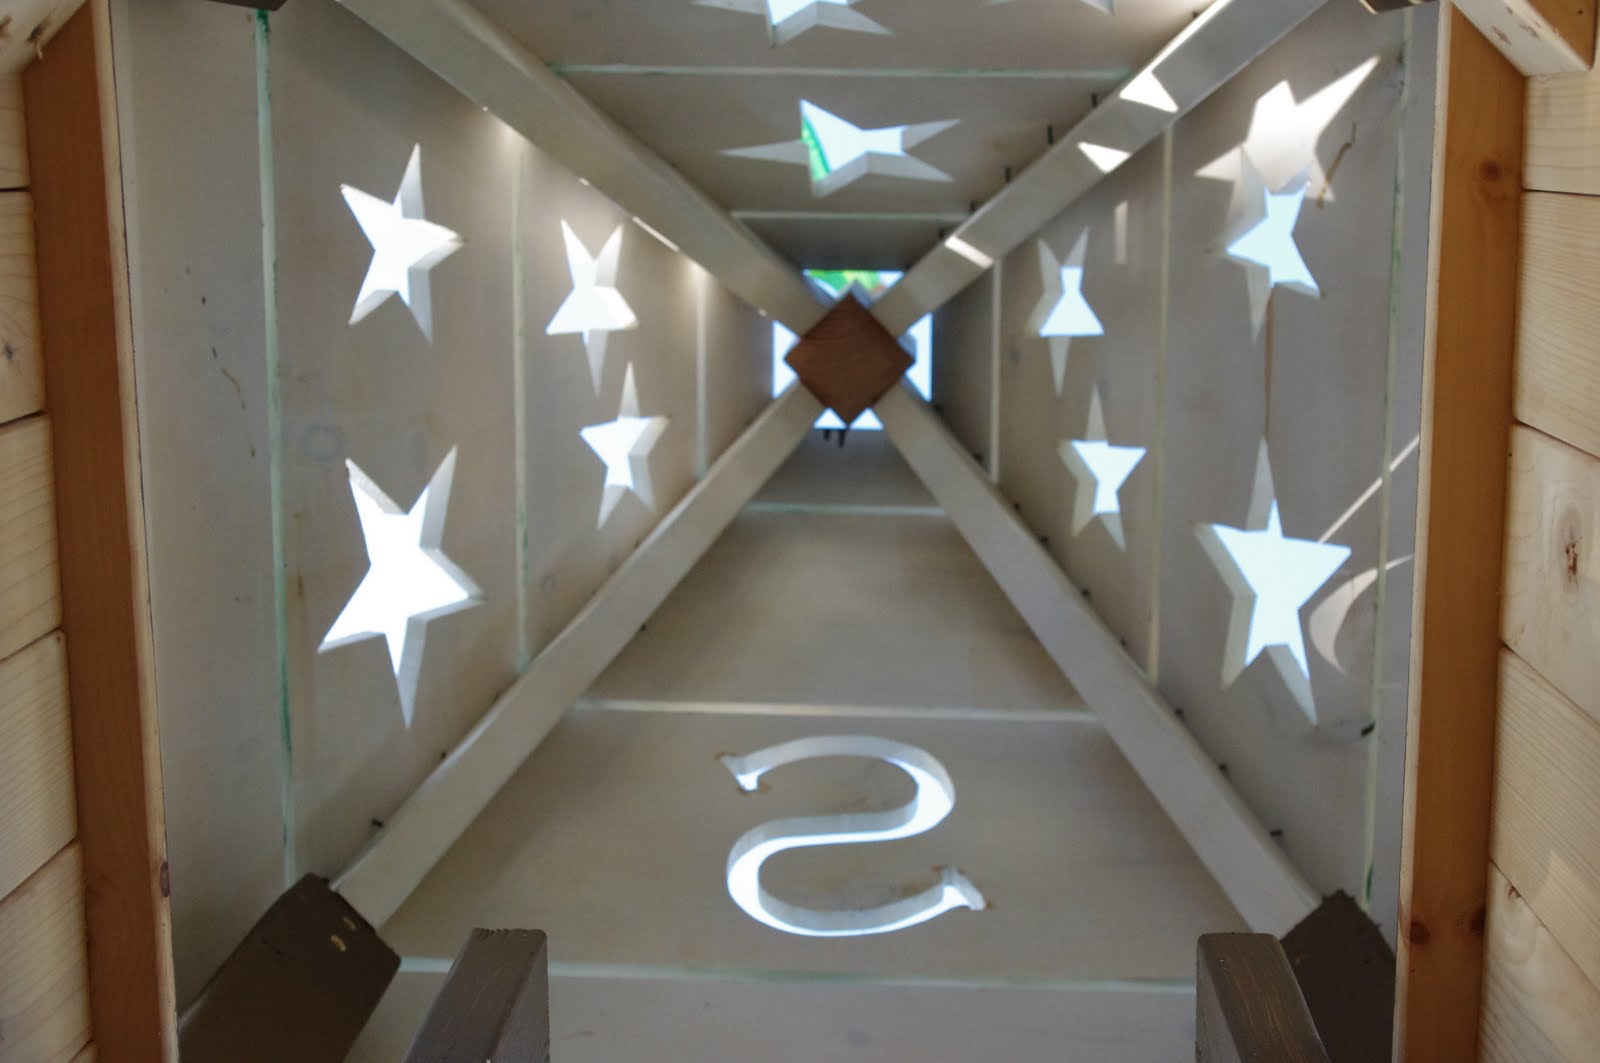
The best part of the lookout is the roof. He jigsawed out stars all around three sides and on the fourth side...


a giant "S" for their shared first initial.


Even the view from inside is pretty cool.

As I write this Mr. Cabin is still in the backyard painting various parts and there is a ton of mulching and landscaping to be done. But until its done, I thought you might enjoy a little playset sneak peek!

Going to show off some of my man's work again at some of these Link Parties.


Enjoy the rest of your week,

Sunday, April 25, 2010

Summer Friends Art

For the longest time, I wasn't sure what I was going to hang on the walls in the girls' room in the cabin. I wanted something to tie in with our farm theme, but I also wanted something that would still fit once they out grew their barn beds. I searched high and low on the internet and nothing seemed quite right. Then I went to my parent's house one day. I was in their basement rifling through an old box of books trying to find something to read to the girls when I came across it, the perfect old picture book from my childhood.


It's called Summer Friends and it is the story of Suzie leaving the country at the end of the summer. She goes to all of  her summer friends- the cow, the chickens, the frog- and asks if they would like to come back to the city with her. But alas, none of her friends want to go to the city. So ingenious little Suzie decides to draw a picture of her summer friends.  "Now," she said, "I will not forget my summer friends when I go home to the city."

I remember reading this book as a child. It was actually reprinted the year I was born. You can tell I loved it because there are my scribbles on some pages and some are taped back together.


THIS was the perfect book for the room. The illustrations were just darling and perfectly fit the farms and the pond near the cabin. Plus, I adored the theme of the book that Suzie's friends would always be with her.

 However, the book was falling apart. Also some of the illustrations that I wanted to use were on the opposite side of the same page so I didn't want to just take the book apart and frame the pages.
Instead,  I decided to make my own art. I bought canvases at the local art store and painted them red, white and blue. I scanned the illustrations into the computer and printed them out. Then once the paint dried, I decoupaged the prints onto the canvas, as simple as that.


For right now, there are three prints on each side of the room. Eventually the girls will have bunk beds in this room and then I can hang all six in a series.
I love that their room has a little piece of my childhood in it now too.

Here is the promised close up photos of their window treatment...


...and one of my flea-market finds, a chair for $4,
perfectly distressed and ready to use in the corner of their room.

Link Parties


Sunday, February 7, 2010

Magnetic Kid's Art Wall

As much as I love my children's art projects...I do, I really do... the fact that they were slowly starting to invade all the empty walls of the house was becoming a problem. Especially when the projects had to be attached with tape - lots and lots of tape. Peel off the paint tape. Ugh.
Can't anyone invent child-proof scotch tape?


Enter Rustoleum with this little can of magnetic wonder. It turns any wall, any surface, magnetic.
The best part is, because it is a primer, you can paint over it any color your little heart desires.
My little heart was desiring lime.
Although hubs was a little hesitant to paint anything that bright.
The compromise and the solution- our back entrance way. It is a small pass through from the back garden into the kitchen with two closets; one we use as a pantry, the other as a coat closet.
It was un-used wall real estate: the perfect place to showcase our little budding Picassos.


I hung a few of my vintage tin signs.  Added "PANTRY" and "COATS" to the closets doors with decals.


Goodbye, scotch tape.
Hello, cute little magnets.


Link Parties:


Related Posts Plugin for WordPress, Blogger...